 |
 |
|
Color Replacer in Photoshop
This is
for Photoshop 5 or higher.
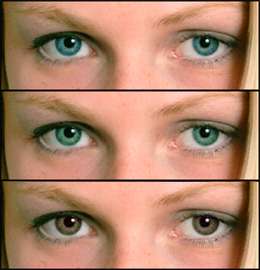
Does the model in figure
below have blue, green, or brown eyes?
|

|
|
figure 18.1 |
Each third of the image is from the exact same scan. After scanning the image in, I duplicated the layer twice and moved the layers apart so that all three could be seen at once. I then set upon replacing the color of the model's eyes.
Even a close-up, zoomed-in examination will not give you a clue as to the real color of the model's eyes. This is because I've used the Color Replacer option in Photoshop to replace the color. In fact, Marianne (the model) has killer blue eyes. She could just as easily have had brown eyes, though, and you'd never know for sure if that was the color I replaced.
The reason that it's so hard to tell that the color has been replaced is that all of the surrounding shades of blue in the eyes have been replaced with corresponding shades of green in the middle third and with brown in the bottom third of the image.
The best part of the process, in my opinion, is the ease with which it's executed. The hardest part is making the selection. You'll need to select the areas you want to change, otherwise any areas in the image that contain the same color(s) will be changed, as well.
Because of the nature of the tool, though, you don't have to be too exact in your selection unless the area you're selecting is surrounded by areas with similar colors. If, for example, Marianne was wearing blue eye makeup, it would have been prudent to exclude that area as I selected the eyes. To make the selections for the image in figure 18.1, I simply used a circular marquee and removed some of the selected areas using the Lasso tool.
To show you the process and how it works, I'll use another image with this scenario: Say you've just finished working on an image for a client. The photo shoot has been done, the image(s) selected and retouched, the layout almost done, etc. when the client decides that they want to go with another color of lip gloss for the campaign. Panic sets in, right? Wrong!
Load the image into Photoshop, select the model's lips, and choose Image, Adjust, Replace Color.
I'll be working with the image shown in figure 18.2.
|

|
|
Figure 18.2 |
To get started, I'll zoom-in on the area I want to work on.
I'll then, select the area using the Lasso tool. Depending on the image you're using and the area you need to select, you may want to use a different method and/or tool.
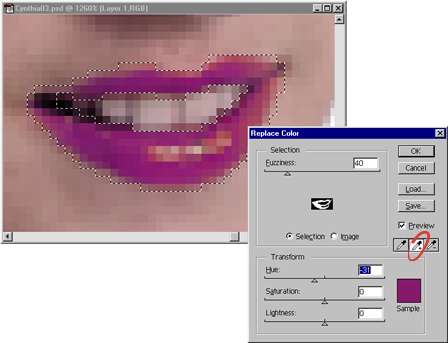
In figure 18.3, you can see that I've already started the process.
|

|
|
Figure 18.3 |
I've zoomed-in, made the selection and run the Replace Color option. As well, I've chosen the initial shade that I want replaced and I've chosen the color I want it replaced with.
To do so, I selected the middle Dropper tool (the one with the small plus sign), shown with a red pen mark around it in figure 18.3, and clicked on the color I want to replace. Because of the nature of the replacement, I chose one of the brightest reds in the models lips.
After choosing the primary color I want replaced, I used the sliders to set the color that it should be replaced with. In this case I simply set the Hue to -31 and left the Saturation and Lightness alone.
To complete the change I simply clicked the other red pixels that were unchanged. Doing so replaced them with corresponding shades of the new color I had chosen.
I told you the process was easy!
Figure 18.4 shows the final image with the model's lip gloss completely (and yet undetectably) changed.
|

|
|
Figure 18.4 |
|

